
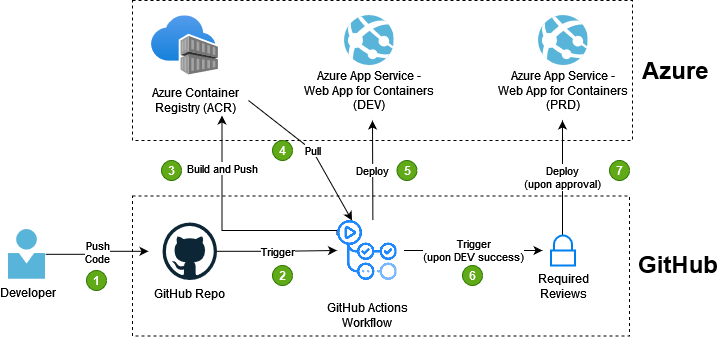
In this article, we’ll see how we can pull a Docker image from an Azure Container Registry (ACR) using GitHub Actions Worflows and deploy it to an Azure App Service - Web App for Container in 2 different envrionments (development and production).
This article is a follow-up of what was done previously in the article where we saw how to build and push a Docker image to an ACR using GitHub Actions.
Therefore, we’re assuming that you already have an image in an Azure Container Registry (in our example from the previous article, we had an ASP.Net Core app) and that you have your project stored in a GitHub repository. If that’s not the case, please refer to the previous article for more background about what was done.
Pre-Requisites
- Basic knowledge of Azure
- Basic knowledge of Git
- Basic knowledge of GitHub Actions
- Basic knowledge of Dockerfile
- Basic knowledge of YAML syntax
- An Azure subscription (you can get one free here)
- A GitHub account (you can sign up here)
1. Create the Resource Groups
First, we’ll want to create the 2 resource groups that will represent our 2 environments. There are multiple ways we can achieve this but, for our example, we’ll use the Azure CLI (you can run these commands directly in the Azure Cloud Shell):
1
2
3
4
5
6
7
8
9
10
11
#Optional - This command is only necessary if you're using a local terminal
az login

DEV_RG_NAME="DEV-ACRCD-RG" #use your own name for this variable
PRD_RG_NAME="PRD-ACRCD-RG" #use your own name for this variable

LOCATION="canadaeast" #use the location that makes the most sense for you

#Creates the resource groups
az group create --name $DEV_RG_NAME --location $LOCATION
az group create --name $PRD_RG_NAME --location $LOCATION
2. Create an Azure Service Principal
In order for GitHub Actions to be able to deploy to our RGs, we’ll need to create service principal with Contributor access on our RGs that will represent GitHub Actions in Azure. In the Azure Cloud Shell (or on a local terminal), run the following command for all your your RGs:
1
2
3
4
SP_Name="GitHubActions-SP"

az ad sp create-for-rbac --name $SP_Name --sdk-auth --role contributor \
    --scopes /subscriptions/{YOUR-SUBSCRIPTION-ID}/resourceGroups/{YOU-RG-NAME}
In the example above, replace the placeholders with your subscription ID and resource group name.
Note: for the purpose of simplicity for this demo, we’ll use the same Service Principal for all RGs, but in a real-life scenario, you might want to have a dedicated Service Principal per environment or realm for better security management.
Once you run the above command, you should get a JSON response in the terminal. You will only need the sections with the clientId, clientSecret, subscriptionId, and tenantId values. Take note of this JSON object as you will need it in a later section:
1
2
3
4
5
6
7
{
    "clientId": "<GUID>",
    "clientSecret": "<GUID>",
    "subscriptionId": "<GUID>",
    "tenantId": "<GUID>",
    (...)
  }
3. Create the App Service ARM Template
Now that we have our RGs setup, let’s create the ARM template that will deploy our ASP.Net app on a Web App for Containers:
1
2
3
4
5
6
7
8
9
10
11
12
13
14
15
16
17
18
19
20
21
22
23
24
25
26
27
28
29
30
31
32
33
34
35
36
37
38
39
40
41
42
43
44
45
46
47
48
49
50
51
52
53
54
55
56
57
58
59
60
61
62
63
64
65
66
67
68
69
70
71
72
73
74
75
76
77
78
79
80
81
82
83
84
85
86
87
88
89
90
91
92
93
94
95
96
97
98
99
100
101
102
103
104
105
106
107
108
109
110
111
112
113
114
115
116
117
118
119
120
121
122
123
124
125
{
    "$schema": "http://schema.management.azure.com/schemas/2015-01-01/deploymentTemplate.json#",
    "contentVersion": "1.0.0.0",
    "parameters": {
        "subscriptionId": {
            "type": "string"
        },
        "name": {
            "type": "string"
        },
        "location": {
            "type": "string"
        },
        "hostingPlanName": {
            "type": "string"
        },
        "serverFarmResourceGroup": {
            "type": "string"
        },
        "alwaysOn": {
            "type": "bool"
        },
        "sku": {
            "type": "string"
        },
        "skuCode": {
            "type": "string"
        },
        "workerSize": {
            "type": "string"
        },
        "workerSizeId": {
            "type": "string"
        },
        "numberOfWorkers": {
            "type": "string"
        },
        "linuxFxVersion": {
            "type": "string"
        },
        "dockerRegistryUrl": {
            "type": "string"
        },
        "dockerRegistryUsername": {
            "type": "string"
        },
        "dockerRegistryPassword": {
            "type": "securestring"
        },
        "dockerRegistryStartupCommand": {
            "type": "string",
            "defaultValue": ""
        },
        "tag_environment": {
            "type": "string"
        }
    },
    "variables": {},
    "resources": [
        {
            "apiVersion": "2018-11-01",
            "name": "[parameters('name')]",
            "type": "Microsoft.Web/sites",
            "location": "[parameters('location')]",
            "tags": {
                "ENVIRONMENT": "[parameters('tag_environment')]"
            },
            "dependsOn": [
                "[concat('Microsoft.Web/serverfarms/', parameters('hostingPlanName'))]"
            ],
            "properties": {
                "name": "[parameters('name')]",
                "siteConfig": {
                    "appSettings": [
                        {
                            "name": "DOCKER_REGISTRY_SERVER_URL",
                            "value": "[parameters('dockerRegistryUrl')]"
                        },
                        {
                            "name": "DOCKER_REGISTRY_SERVER_USERNAME",
                            "value": "[parameters('dockerRegistryUsername')]"
                        },
                        {
                            "name": "DOCKER_REGISTRY_SERVER_PASSWORD",
                            "value": "[parameters('dockerRegistryPassword')]"
                        },
                        {
                            "name": "WEBSITES_ENABLE_APP_SERVICE_STORAGE",
                            "value": "false"
                        }
                    ],
                    "linuxFxVersion": "[parameters('linuxFxVersion')]",
                    "appCommandLine": "[parameters('dockerRegistryStartupCommand')]",
                    "alwaysOn": "[parameters('alwaysOn')]"
                },
                "serverFarmId": "[concat('/subscriptions/', parameters('subscriptionId'),'/resourcegroups/', parameters('serverFarmResourceGroup'), '/providers/Microsoft.Web/serverfarms/', parameters('hostingPlanName'))]",
                "clientAffinityEnabled": false,
                "virtualNetworkSubnetId": null
            }
        },
        {
            "apiVersion": "2018-11-01",
            "name": "[parameters('hostingPlanName')]",
            "type": "Microsoft.Web/serverfarms",
            "location": "[parameters('location')]",
            "kind": "linux",
            "tags": {
                "ENVIRONMENT": "[parameters('tag_environment')]"
            },
            "dependsOn": [],
            "properties": {
                "name": "[parameters('hostingPlanName')]",
                "workerSize": "[parameters('workerSize')]",
                "workerSizeId": "[parameters('workerSizeId')]",
                "numberOfWorkers": "[parameters('numberOfWorkers')]",
                "reserved": true,
                "zoneRedundant": false
            },
            "sku": {
                "Tier": "[parameters('sku')]",
                "Name": "[parameters('skuCode')]"
            }
        }
    ]
}
This ARM template will deploy an App Service Plan as well as the Web App for Container itself from a specific ACR. I’ve also added a parameter “tag_environment” for us to tag our resources to later identiy in which environment they reside. We’ll save this template in the same folder as our .csproj file with the name “azuredeploy.json”.
4. Get the ACR Credentials
Note: if you’re coming from the previous article, you can skip this section
Navigate to your ACR in the Azure portal, go to the “Access Keys”, make sure to enable “Admin user” and take note of the username and password :
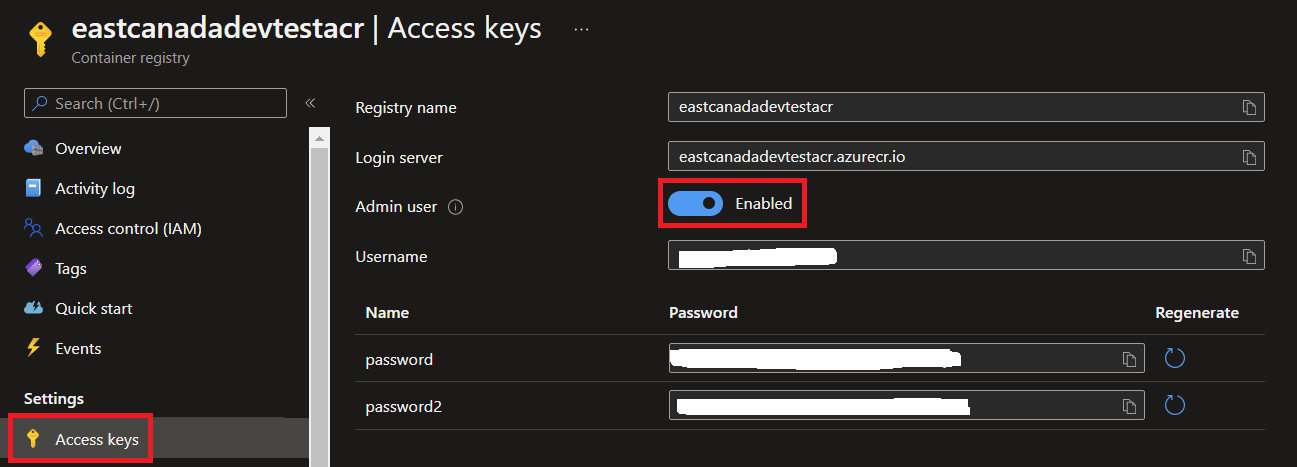
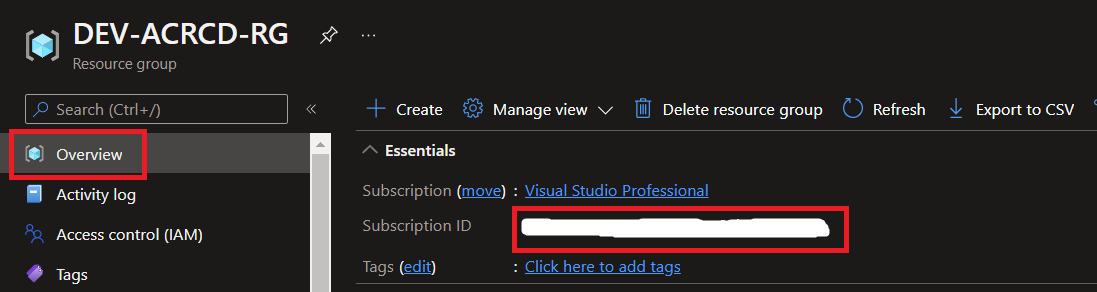
Also, you’ll want to take note of your subscription ID as well:
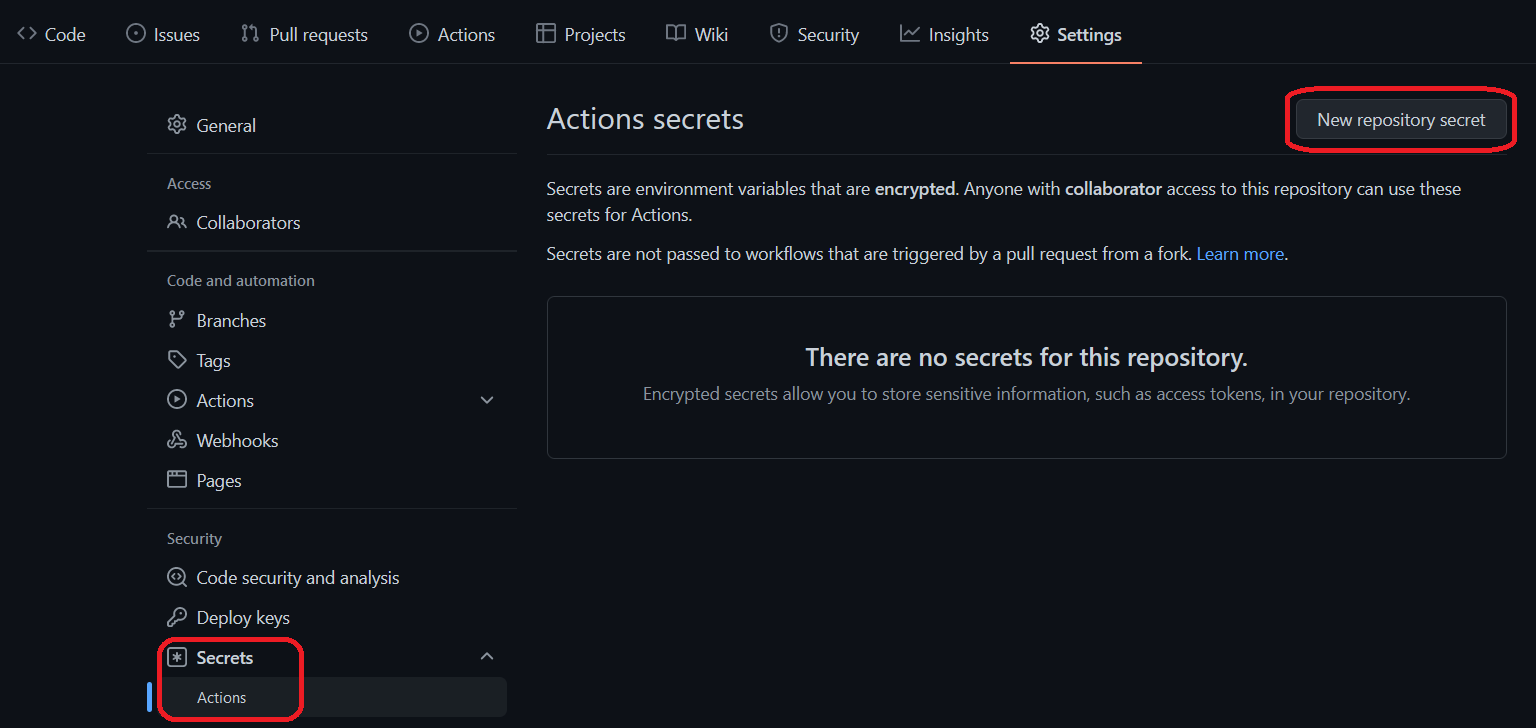
5. Add our Secrets in GitHub
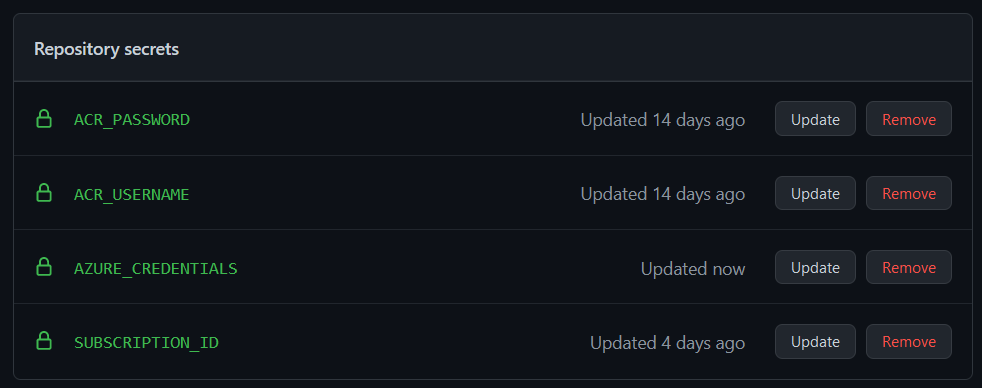
Next, we’ll need to store the ACR’s credentials, subscription ID and the Service Principal info (noted earlier) as secrets in GitHub. To do so, go to the “Settings” tab and select Secrets > Actions as shown below and “New repository secret”:
Once added, they should appear like this and be ready to be used:
Note: Another way we could’ve done this is to put the secrets in an Azure Keyvault and refer to them from our GitHub Workflow
6. Create Environments in GitHub
We’ll now setup 2 environments in GitHub that will represent our development and production environments. Also, by creating environments in GitHub, it will also give us the chance to setup pre-deployment manual approvers for a high environment such as production (like we would want to have in a real-life scenario).
Note: As of May 2022, environments, environment protection rules, and environment secrets are available in public repositories for all products. For access to environments in private repositories, you must use GitHub Enterprise
To set the environments, go to “Settings” tab and select Environments and “New environments”. For the fictional “production” environments, I’ll add myself as a pre-deployment reviewer and for all environments, let’s just specify the deployment branch as “master” (again, this is for the purpose of simplicity).
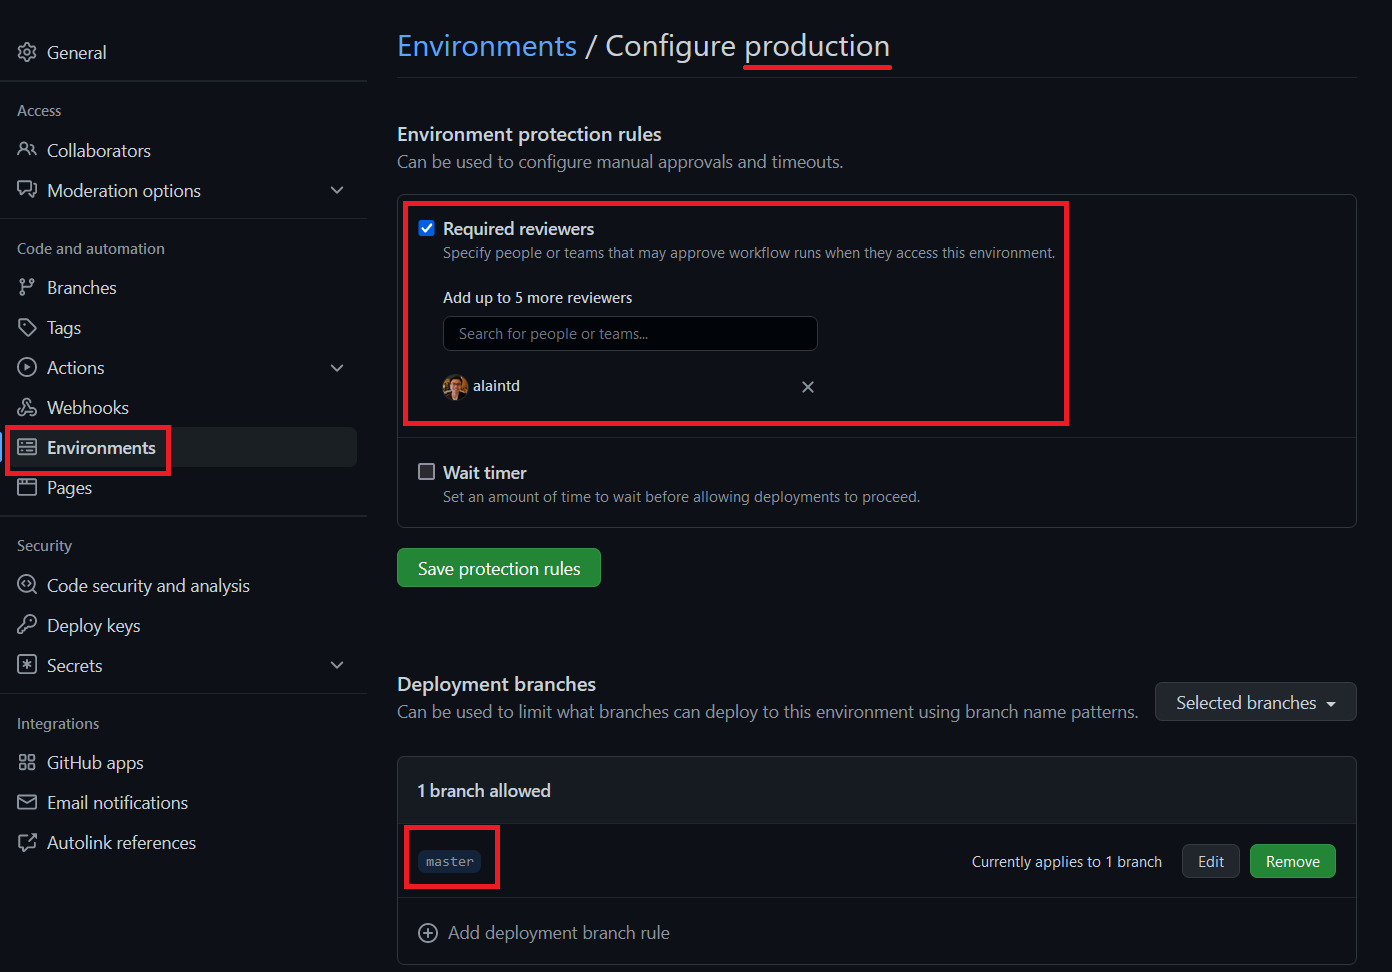
Finally, it’s also possible to add environment secrets if let’s say you had a different subscription id for each environment, but we’ll ignore that for this example.

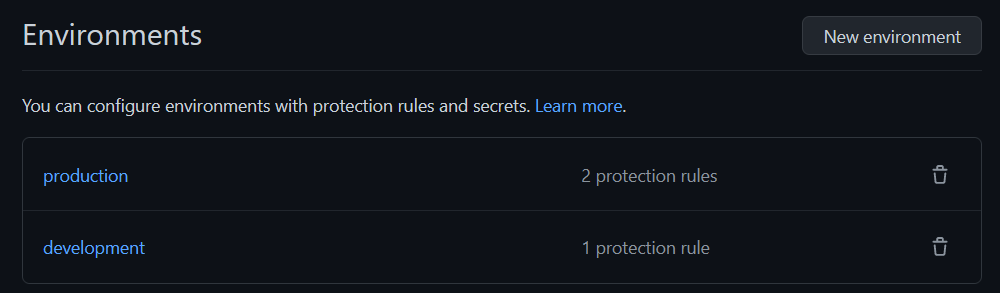
We now have our 2 environments ready to be used by our workflow:
7. Create the GitHub Workflow
Now it’s time to create our workflow in GitHub. To do this, we’ll build over the workflow that we’ve built in the previous article. As a reminder, this is the workflow we have so far that basically builds and pushes an ASP.Net app Docker image to an ACR:
1
2
3
4
5
6
7
8
9
10
11
12
13
14
15
16
17
18
19
20
21
22
23
24
25
26
27
28
29
30
name: SampleWebApp CICD

on:
  push:
    branches: [ master ]
  pull_request:
    branches: [ master ]

jobs:

  build:
    runs-on: ubuntu-latest

    steps:
    - uses: actions/checkout@v3

    - name: Azure Container Registry Login
        uses: Azure/docker-login@v1
        with:
        # Container registry server url
        login-server: eastcanadadevtestacr.azurecr.io
        # Container registry username
        username: ${{ secrets.ACR_USERNAME }}
        # Container registry password
        password: ${{ secrets.ACR_PASSWORD }}

    - name: Build and Push the Docker image
      run:  |
       docker build ./SampleWebApplication -t eastcanadadevtestacr.azurecr.io/samplewebapp:${{ github.run_id }}
       docker push eastcanadadevtestacr.azurecr.io/samplewebapp:${{ github.run_id }}
We’ll put our ACR url in an environment variable that will be scoped to the whole workflow (since we’ll use it in multiple places) and add the “dev” and “prd” stages where we’ll deploy the ARM template. The workflow should then look like the below:
1
2
3
4
5
6
7
8
9
10
11
12
13
14
15
16
17
18
19
20
21
22
23
24
25
26
27
28
29
30
31
32
33
34
35
36
37
38
39
40
41
42
43
44
45
46
47
48
49
50
51
52
53
54
55
56
57
58
59
60
61
62
63
64
65
66
67
68
69
70
71
72
73
74
75
76
77
78
79
80
81
82
83
84
85
86
87
88
89
90
91
92
93
94
95
96
97
98
99
100
101
102
103
104
105
106
107
108
109
110
111
112
113
114
115
116
117
118
119
120
121
122
123
124
125
126
127
128
129
130
131
132
133
134
135
136
137
name: SampleWebApp CICD

on:
  push:
    branches: [master]
  pull_request:
    branches: [master]

env:
  DOCKER_REGISTRY_URL: eastcanadadevtestacr.azurecr.io

jobs:
  build:
    runs-on: ubuntu-latest

    steps:
      - uses: actions/checkout@v3

      - name: Azure Container Registry Login
        uses: Azure/docker-login@v1
        with:
          # Container registry server url
          login-server: ${{ env.DOCKER_REGISTRY_URL }}
          # Container registry username
          username: ${{ secrets.ACR_USERNAME }}
          # Container registry password
          password: ${{ secrets.ACR_PASSWORD }}

      - name: Build and Push the Docker image
        run: |
          docker build ./SampleWebApplication -t ${{ env.DOCKER_REGISTRY_URL }}/samplewebapp:${{ github.run_id }}
          docker push ${{ env.DOCKER_REGISTRY_URL }}/samplewebapp:${{ github.run_id }}

      - name: Package ARM Template
        uses: actions/upload-artifact@v2
        with:
          name: arm-templates
          path: ${{ github.workspace }}/SampleWebApplication/azuredeploy.json
          retention-days: 5

  dev:
    runs-on: ubuntu-latest

    needs: build
    environment: development

    env:
      ENVIRONMENT_PREFIX: dev

      SERVER_FARM_RESOURCE_GROUP_NAME: DEV-ACRCD-RG #insert the name of your own RG here
      WEBAPP_LOCATION: canadacentral #insert your desired location here
      WEBAPP_SKU: Basic
      WEBAPP_SKU_CODE: B1

      TAG_ENVIRONMENT: DEVELOPMENT

    steps:

      - name: Download ARM Templates
        uses: actions/download-artifact@v3
        with:
          name: arm-templates

      - name: "Login via Azure CLI"
        uses: azure/login@v1
        with:
          creds: ${{ secrets.AZURE_CREDENTIALS }}

      - name: Deploy ARM Template
        uses: azure/arm-deploy@v1
        with:
          subscriptionId: ${{ secrets.SUBSCRIPTION_ID }}
          resourceGroupName: ${{ env.SERVER_FARM_RESOURCE_GROUP_NAME }}
          deploymentMode: Incremental
          template: azuredeploy.json
          parameters: >
            subscriptionId="${{ secrets.SUBSCRIPTION_ID }}"
            name="${{ env.ENVIRONMENT_PREFIX }}-devops-samplewebapp"
            location="${{ env.WEBAPP_LOCATION }}"
            hostingPlanName="${{ env.ENVIRONMENT_PREFIX }}-asp"
            serverFarmResourceGroup="${{ env.SERVER_FARM_RESOURCE_GROUP_NAME }}"
            sku="${{ env.WEBAPP_SKU }}"
            skuCode="${{ env.WEBAPP_SKU_CODE }}"
            linuxFxVersion="DOCKER|${{ env.DOCKER_REGISTRY_URL }}/samplewebapp:${{ github.run_id }}"
            dockerRegistryUrl="${{ env.DOCKER_REGISTRY_URL }}"
            dockerRegistryUsername="${{ secrets.ACR_USERNAME }}"
            dockerRegistryPassword="${{ secrets.ACR_PASSWORD }}"
            tag_environment="${{ env.TAG_ENVIRONMENT }}"

  prd:
    runs-on: ubuntu-latest

    needs: dev
    environment: production

    env:
      ENVIRONMENT_PREFIX: prd

      SERVER_FARM_RESOURCE_GROUP_NAME: PRD-ACRCD-RG #insert the name of your own RG here
      WEBAPP_LOCATION: canadacentral #insert your desired location here
      WEBAPP_SKU: Basic
      WEBAPP_SKU_CODE: B1

      TAG_ENVIRONMENT: PRODUCTION

    steps:

      - name: Download ARM Templates
        uses: actions/download-artifact@v3
        with:
          name: arm-templates

      - name: "Login via Azure CLI"
        uses: azure/login@v1
        with:
          creds: ${{ secrets.AZURE_CREDENTIALS }}

      - name: Deploy ARM Template
        uses: azure/arm-deploy@v1
        with:
          subscriptionId: ${{ secrets.SUBSCRIPTION_ID }}
          resourceGroupName: ${{ env.SERVER_FARM_RESOURCE_GROUP_NAME }}
          deploymentMode: Incremental
          template: azuredeploy.json
          parameters: >
            subscriptionId="${{ secrets.SUBSCRIPTION_ID }}"
            name="${{ env.ENVIRONMENT_PREFIX }}-devops-samplewebapp"
            location="${{ env.WEBAPP_LOCATION }}"
            hostingPlanName="${{ env.ENVIRONMENT_PREFIX }}-asp"
            serverFarmResourceGroup="${{ env.SERVER_FARM_RESOURCE_GROUP_NAME }}"
            sku="${{ env.WEBAPP_SKU }}"
            skuCode="${{ env.WEBAPP_SKU_CODE }}"
            linuxFxVersion="DOCKER|${{ env.DOCKER_REGISTRY_URL }}/samplewebapp:${{ github.run_id }}"
            dockerRegistryUrl="${{ env.DOCKER_REGISTRY_URL }}"
            dockerRegistryUsername="${{ secrets.ACR_USERNAME }}"
            dockerRegistryPassword="${{ secrets.ACR_PASSWORD }}"
            tag_environment="${{ env.TAG_ENVIRONMENT }}"
Note: You’ll notice that the “dev” and “prd” stages have the same steps and that only the parameters that are provided to the ARM template differ. We’ll have a look in another article (Coming Soon!) on how we can leverage reusable workflows to avoid code duplication but for now, let’s keep the workflow as simple as possible to focus on the deployment part.
You’ll notice that our 2 stages have the following elements:
1
2
needs: <build/dev>
environment: <development/production>
The “needs” key specify a job that must be successfully completed before the current one can be executed.
The “environment” key links our stage to one of the environment we’ve created earlier and the stage will be subject to any rules configured for that environment. For example, if the environment requires reviewers (such as our production environment), the job will pause until one of the reviewers approves the job.
For the ARM template deployment step, we’re using the GitHub Action for ARM deployment.
8. Demo of the Whole Flow
Once we’re done editing our workflow, let’s push it to our repository and it should trigger our workflow (under the “Actions” tab in GitHub):
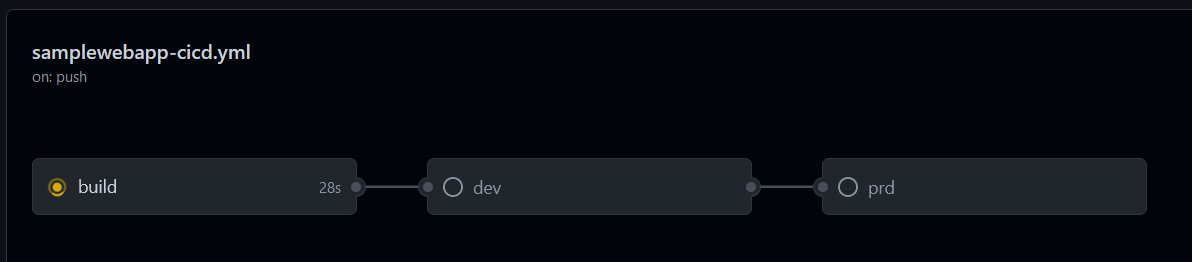
Once the “build” stage is done, the “dev” stage automatically starts and will deploy the web app to the development RG:
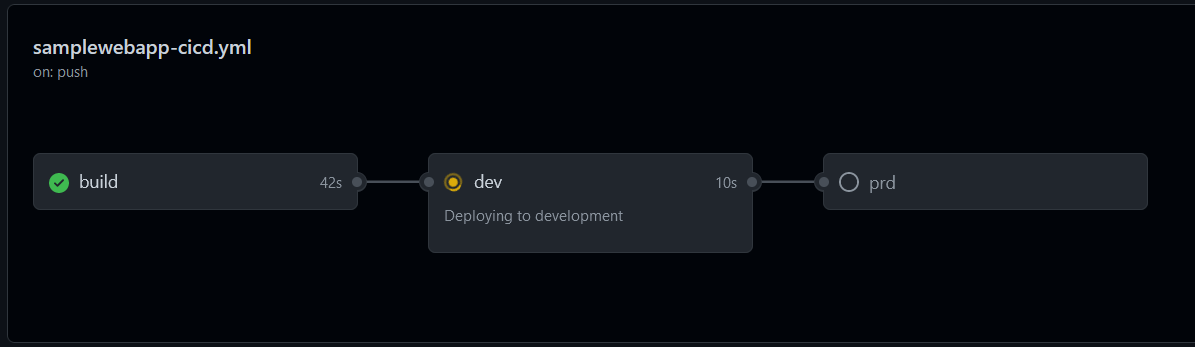
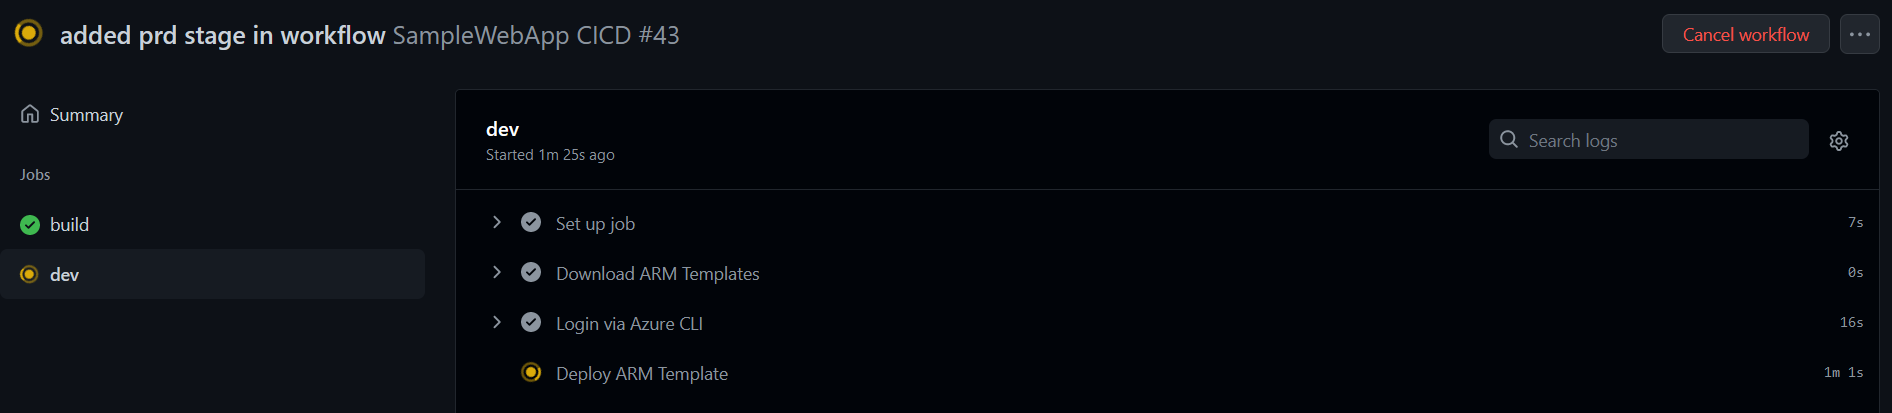
You can click on the stage to see the progress:
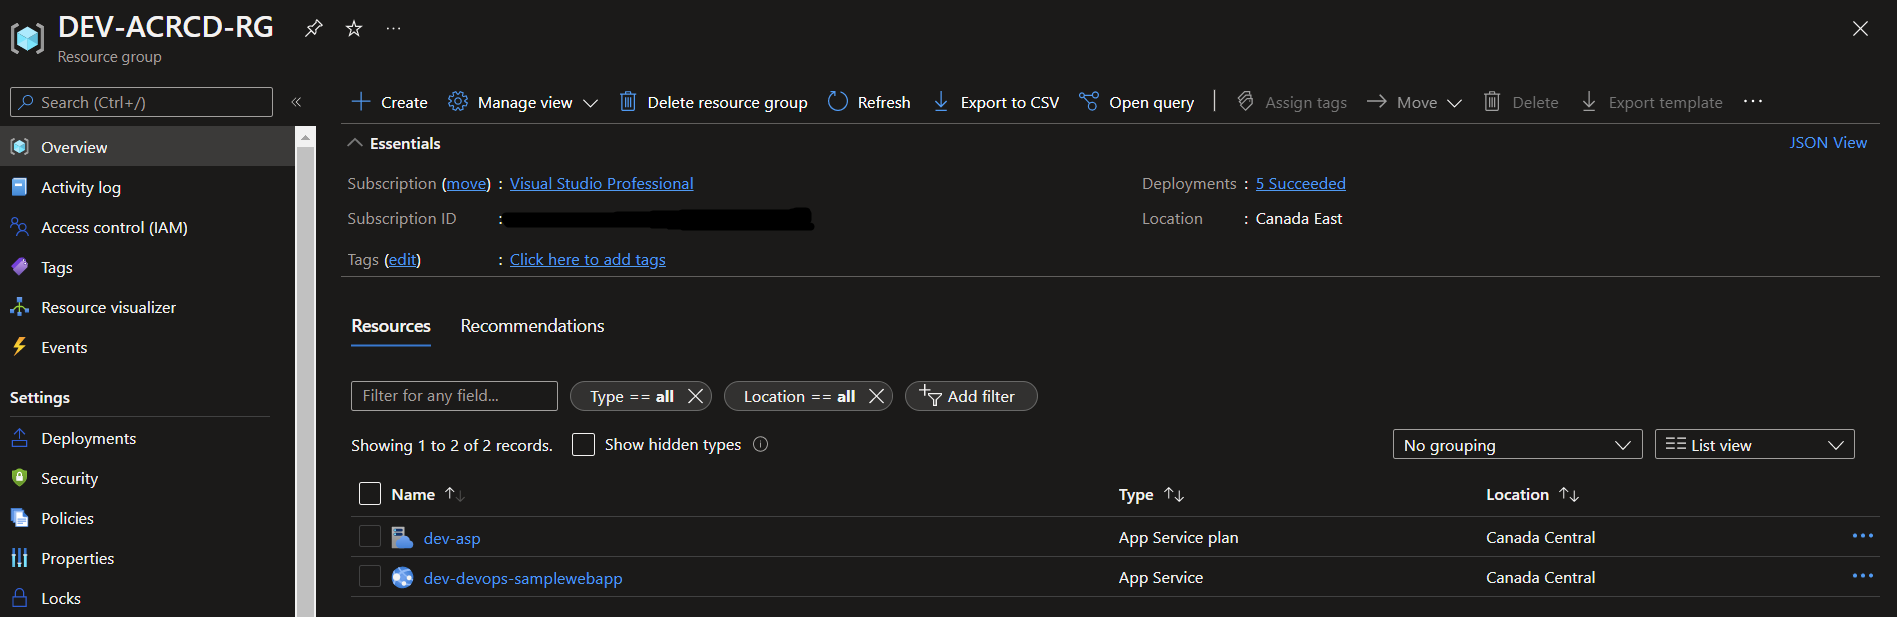
Once the deployment is successful, you can validate the web app in the portal in the development RG:
You can navigate to the web app’s url as well to see that the web app is up and running:

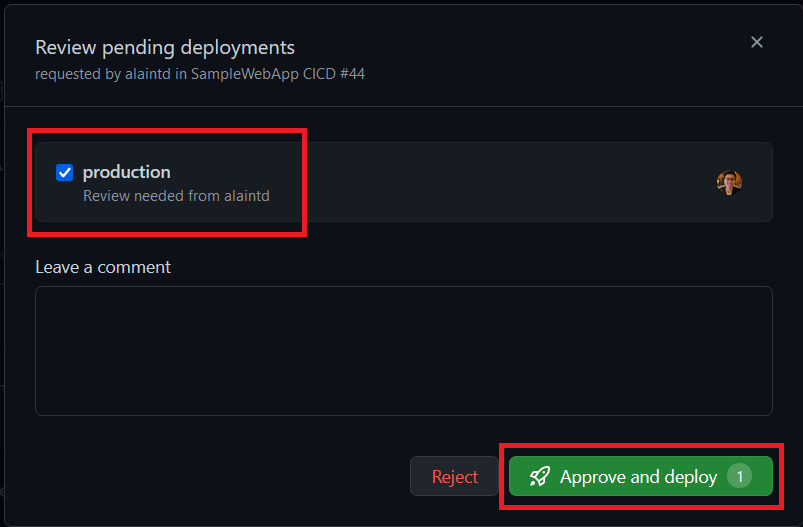
Now that we’ve validated the “dev” stage, we can go back to our workflow in GitHub. Notice that the “prd” stage is pending the review of an approver:
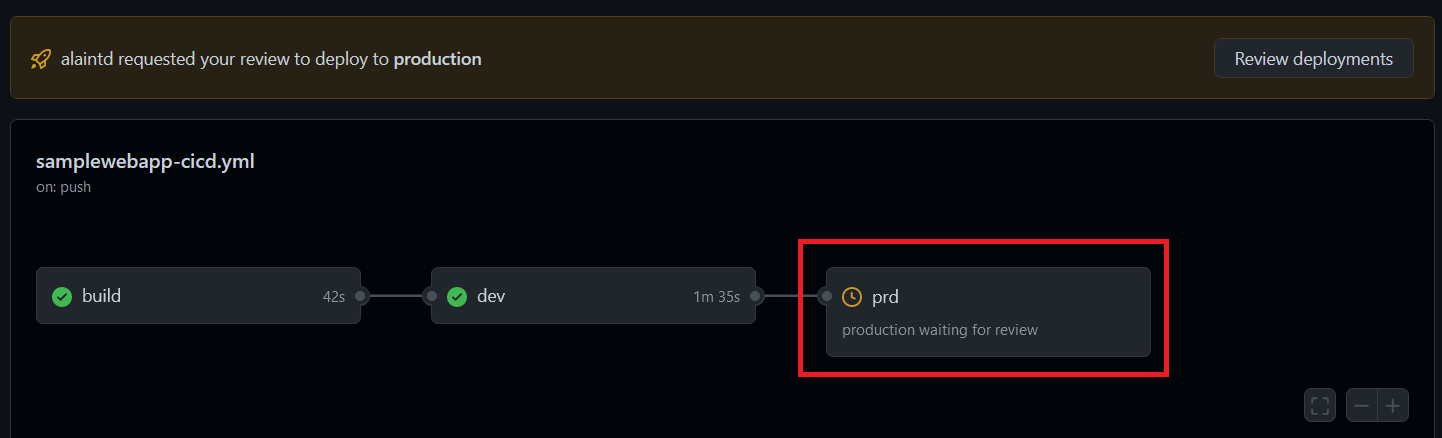
To review and approve the deployment, click on “Review deployments”:
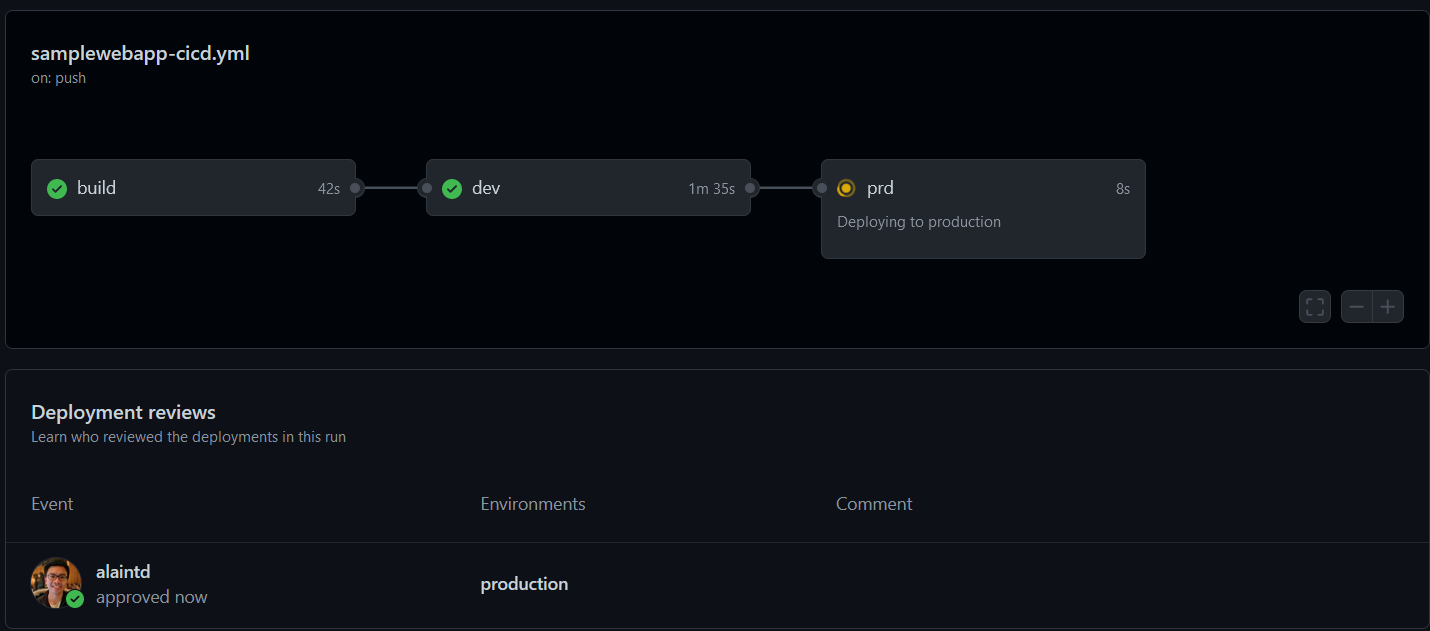
Upon approval, the “prd” job starts:
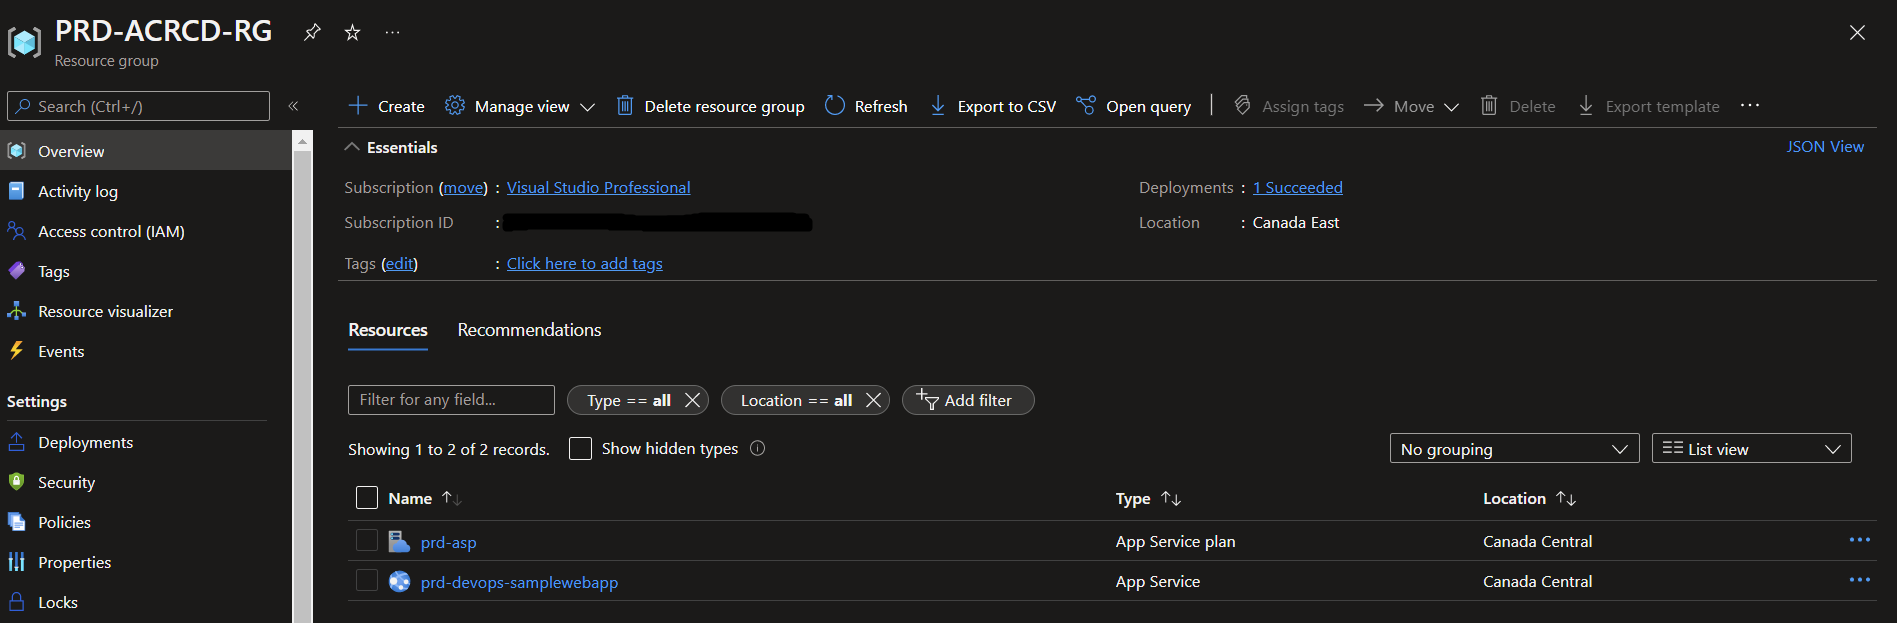
Once successful, we can validate that the resources have been correctly deployed in the portal like we did for “dev”:
Next Steps
Whew, we’ve made it! We were able to deploy a simple ASP.Net Web App from an Azure Container Registry to an App Service in Azure in 2 different environments using GitHub Actions! As mentionned previously, as a next step, something we could do to improve our workflow readability and maintainability would be to build a reusable workflow for all of our deployment stages. We’ll tackle this in the next article.
I hope this article has been useful to you! Again, and as always, I’d love to hear your feedback and if you have any questions or something you’d like to add based on your experience, please let me know in the comments section below!
If you’d like to see more content like this in the future and keep in touch, feel free to follow me on Twitter and LinkedIn!