
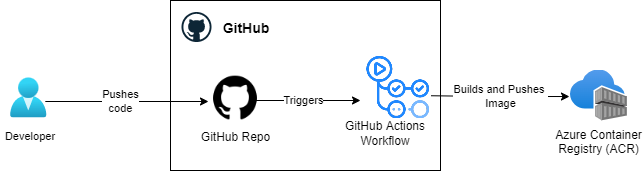
In this article, we’ll have a look at how we can use GitHub Actions Workflows to build and push a Docker image in an Azure Container Registry.
Pre-Requisites
- Basic knowledge of Azure and the Portal
- Basic knowledge of Git
- Basic knowledge of GitHub Actions
- Basic knowledge of Dockerfile
- Basic knowledge of YAML syntax
- An Azure subscription (you can get one free here)
- A GitHub account (you can sign up here)
1. Create the Azure Container Registry (ACR)
First, we’ll want to create the Azure Container Registry that will store our images (as well as the resource group that will hold the container registry). There are multiple ways we can achieve this but for our example, we’ll use the Azure CLI (you can run these commands directly in the Azure Cloud Shell):
1
2
3
4
5
6
7
8
9
10
11
#Optional - This command is only necessary if you're using a local terminal
az login

ACR_RG_NAME="acrTest-RG" #use your own name for this variable
ACR_NAME="eastcanadadevtestacr" #use your own name for this variable

#Creates the resource group that will store the ACR
az group create --name $ACR_RG_NAME --location canadaeast

#Creates the ACR in the resource group that was created earlier
az acr create --resource-group myResourceGroup --name $ACR_NAME --sku Basic
When creating the ACR, please note that the name has to be unique in Azure and contain 5-50 alphanumeric characters. If the ACR_NAME is already taken, please feel free to use another unique name instead for the ACR.
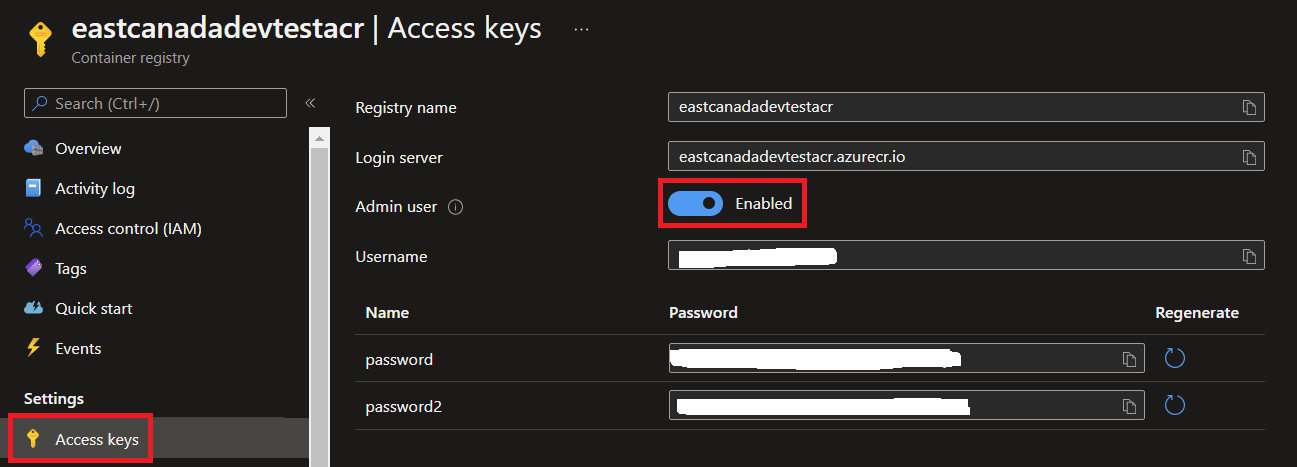
Once the ACR has been created, navigate to it in the Azure portal, go to the “Access Keys”, make sure to enable “Admin user” and take note of the username and password (you’ll need it for a later section):
2. Setup the GitHub Repo
Next, if you don’t have one already, you should create a GitHub repository that will store your code.
Once your GitHub repo has been created, you can push your project’s code to it.
3. Create a Sample Application and Dockerfile
In this section, we’ll create a very simple ASP.Net application and Dockerfile using Visual Studio as an example that will be built and pushed to the ACR. However, if you have your own application and Dockerfile already in GitHub, please feel free to use that instead and skip this section.
The Dockerfile for this example looks like this (to give more context, this Dockerfile resides in the same folder as the .csproj):
1
2
3
4
5
6
7
8
9
10
11
12
13
14
15
16
17
18
19
20
21
22
FROM mcr.microsoft.com/dotnet/aspnet:6.0 AS base
WORKDIR /app
EXPOSE 80
EXPOSE 443

FROM mcr.microsoft.com/dotnet/sdk:6.0 AS build
WORKDIR /src
COPY ["SampleWebApplication.csproj", "SampleWebApplication/"]
RUN dotnet restore "SampleWebApplication/SampleWebApplication.csproj"

WORKDIR "/src/SampleWebApplication"
COPY . .

RUN dotnet build "SampleWebApplication.csproj" -c Release -o /app/build

FROM build AS publish
RUN dotnet publish "SampleWebApplication.csproj" -c Release -o /app/publish

FROM base AS final
WORKDIR /app
COPY --from=publish /app/publish .
ENTRYPOINT ["dotnet", "SampleWebApplication.dll"]
4. Add ACR Credentials as Secrets in GitHub
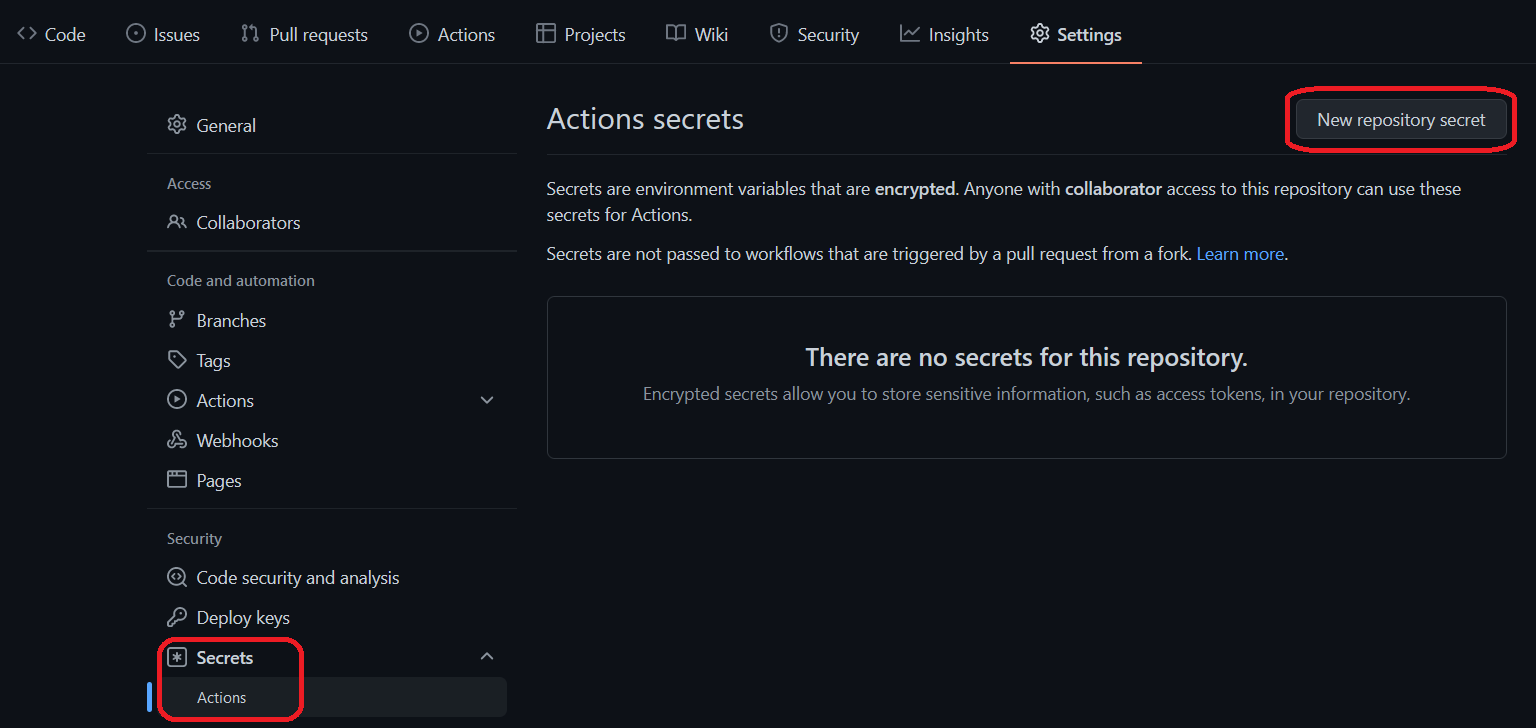
Next, we’ll need to store our ACR’s credentials (that you noted earlier) as secrets in GitHub - we wouldn’t want to hardcode any credentials in code, right? ;) To do so, go to the “Settings” tab and select Secrets > Actions as shown below and “New repository secret”:
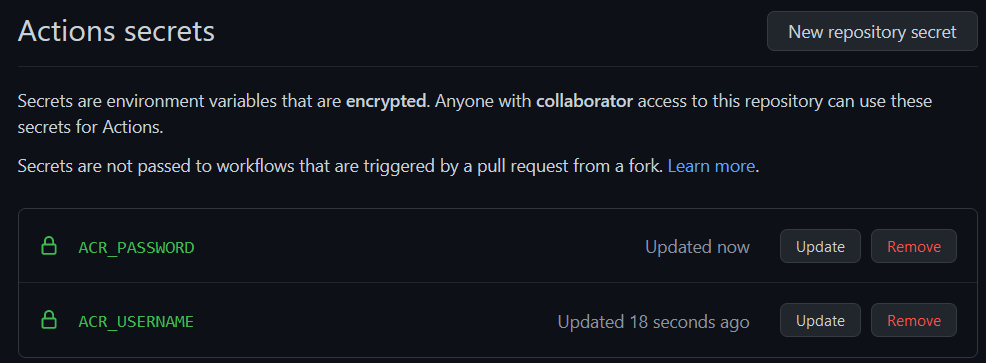
Once added, they should appear like this and be ready to be used:
Note: Another way we could’ve done this is to put the secrets in an Azure Keyvault and refer to them from our GitHub Workflow
5. Create the GitHub Workflow
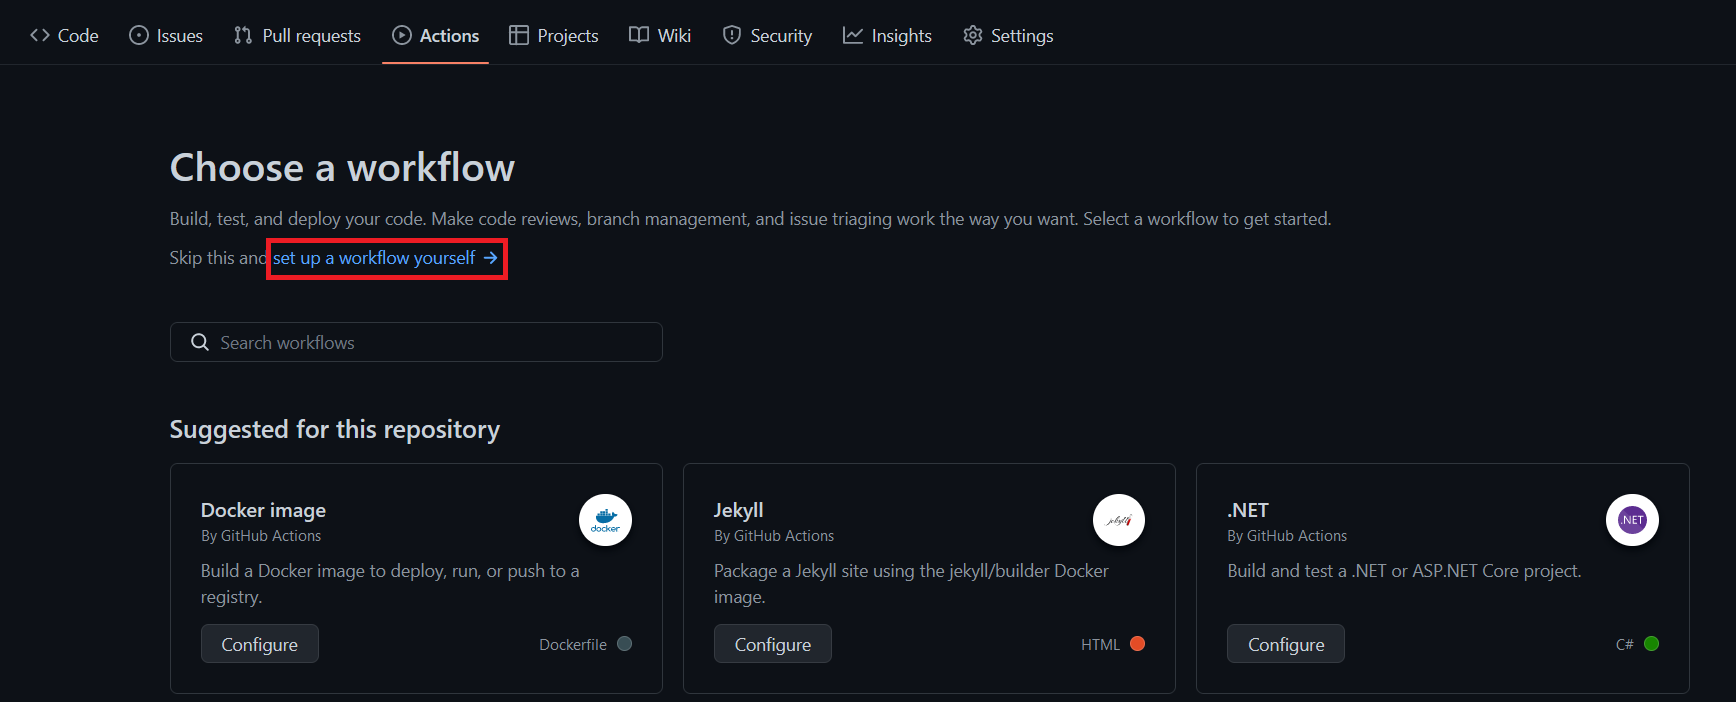
Now it’s time to create our workflow in GitHub. To do so, go to your project’s repo in GitHub and go to the “Actions” tab and select “setup a workflow yourself” as shown below:
First, you want to give a nice and meaningful name to your workflow (ok, I admit that the name below might not be that great, but you get the idea):
1
name: SampleWebApp CICD
Next, you’ll want to set the branches that will trigger the workflow (either through a change or pull request). For simplicity, in this example, the workflow is only triggered from the main branch but obviously, you’d want to set this in alignment with your branching strategy:
1
2
3
4
5
on:
  push:
    branches: [ master ]
  pull_request:
    branches: [ master ]
Finally, let’s write the meat of the workflow. In our example, we have one job (named “build”) that runs on a GitHub-Hosted Ubuntu runner. Note that for this example we’re using a Ubuntu runner but depending on the needs of your build, you might want to use another GitHub-Hosted runner or even your private self-hosted runner. For more info about GitHub-Hosted runners and their capabilities, you can refer to the official documentation About GitHub-Hosted Runners .
1
2
3
4
jobs:

  build:
    runs-on: ubuntu-latest
Our build job would have 3 steps:
1
2
3
4
5
6
7
8
9
10
11
12
13
14
15
16
17
    steps:
    - uses: actions/checkout@v3

    - name: Azure Container Registry Login
        uses: Azure/docker-login@v1
        with:
        # Container registry server url
        login-server: eastcanadadevtestacr.azurecr.io
        # Container registry username
        username: ${{ secrets.ACR_USERNAME }}
        # Container registry password
        password: ${{ secrets.ACR_PASSWORD }}

    - name: Build and Push the Docker image
      run:  |
       docker build ./SampleWebApplication -t eastcanadadevtestacr.azurecr.io/samplewebapp:${{ github.run_id }}
       docker push eastcanadadevtestacr.azurecr.io/samplewebapp:${{ github.run_id }}
The first step is where we checkout the code from source control (pretty common). Next, we use a step that logs us in to our ACR by referring to the secrets that you created earlier. Finally, we run a docker command that builds and tags the image and another that pushes the image to the ACR.
Below is the full workflow YAML file:
1
2
3
4
5
6
7
8
9
10
11
12
13
14
15
16
17
18
19
20
21
22
23
24
25
26
27
28
29
30
name: SampleWebApp CICD

on:
  push:
    branches: [ master ]
  pull_request:
    branches: [ master ]

jobs:

  build:
    runs-on: ubuntu-latest

    steps:
    - uses: actions/checkout@v3

    - name: Azure Container Registry Login
        uses: Azure/docker-login@v1
        with:
        # Container registry server url
        login-server: eastcanadadevtestacr.azurecr.io
        # Container registry username
        username: ${{ secrets.ACR_USERNAME }}
        # Container registry password
        password: ${{ secrets.ACR_PASSWORD }}

    - name: Build and Push the Docker image
      run:  |
       docker build ./SampleWebApplication -t eastcanadadevtestacr.azurecr.io/samplewebapp:${{ github.run_id }}
       docker push eastcanadadevtestacr.azurecr.io/samplewebapp:${{ github.run_id }}
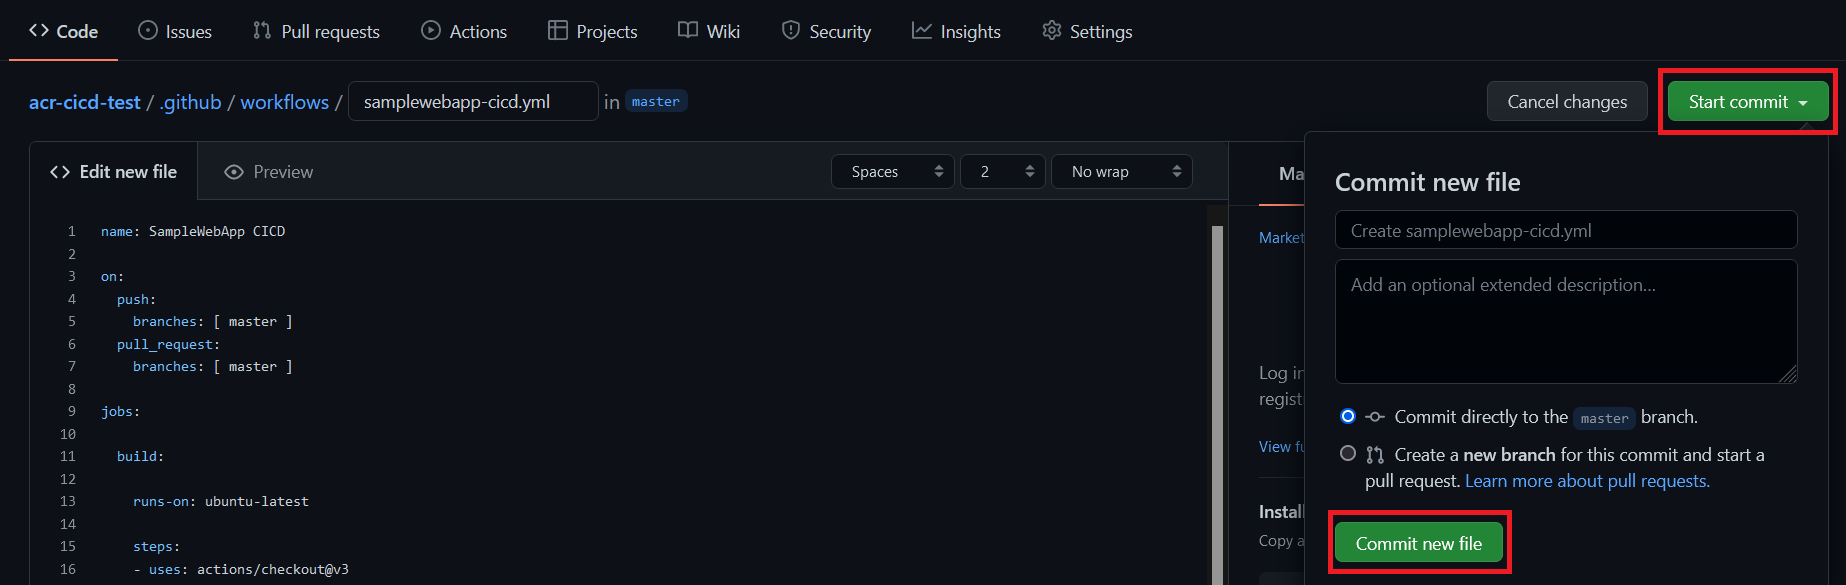
Once you’re done editing your workflow, you can commit it - in our example, we’ll commit directly to master branch for simplicity but you’ll obviously want to respect your branching strategy for this part:
6. Commit and push your code
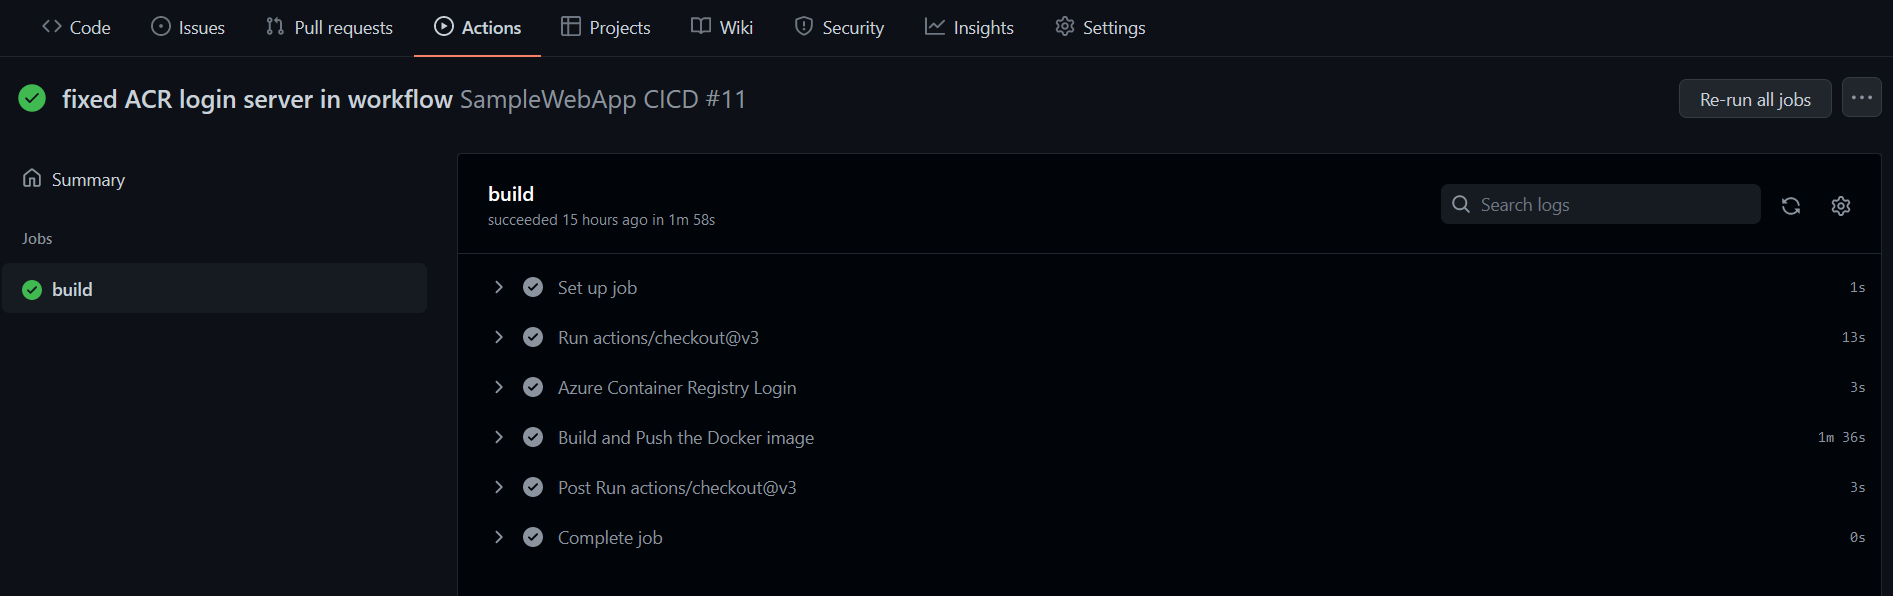
Once your workflow has been setup, you can start making changes to your repository’s code and the workflow will automatically get triggered. You can monitor your workflow under the “Actions” tab:
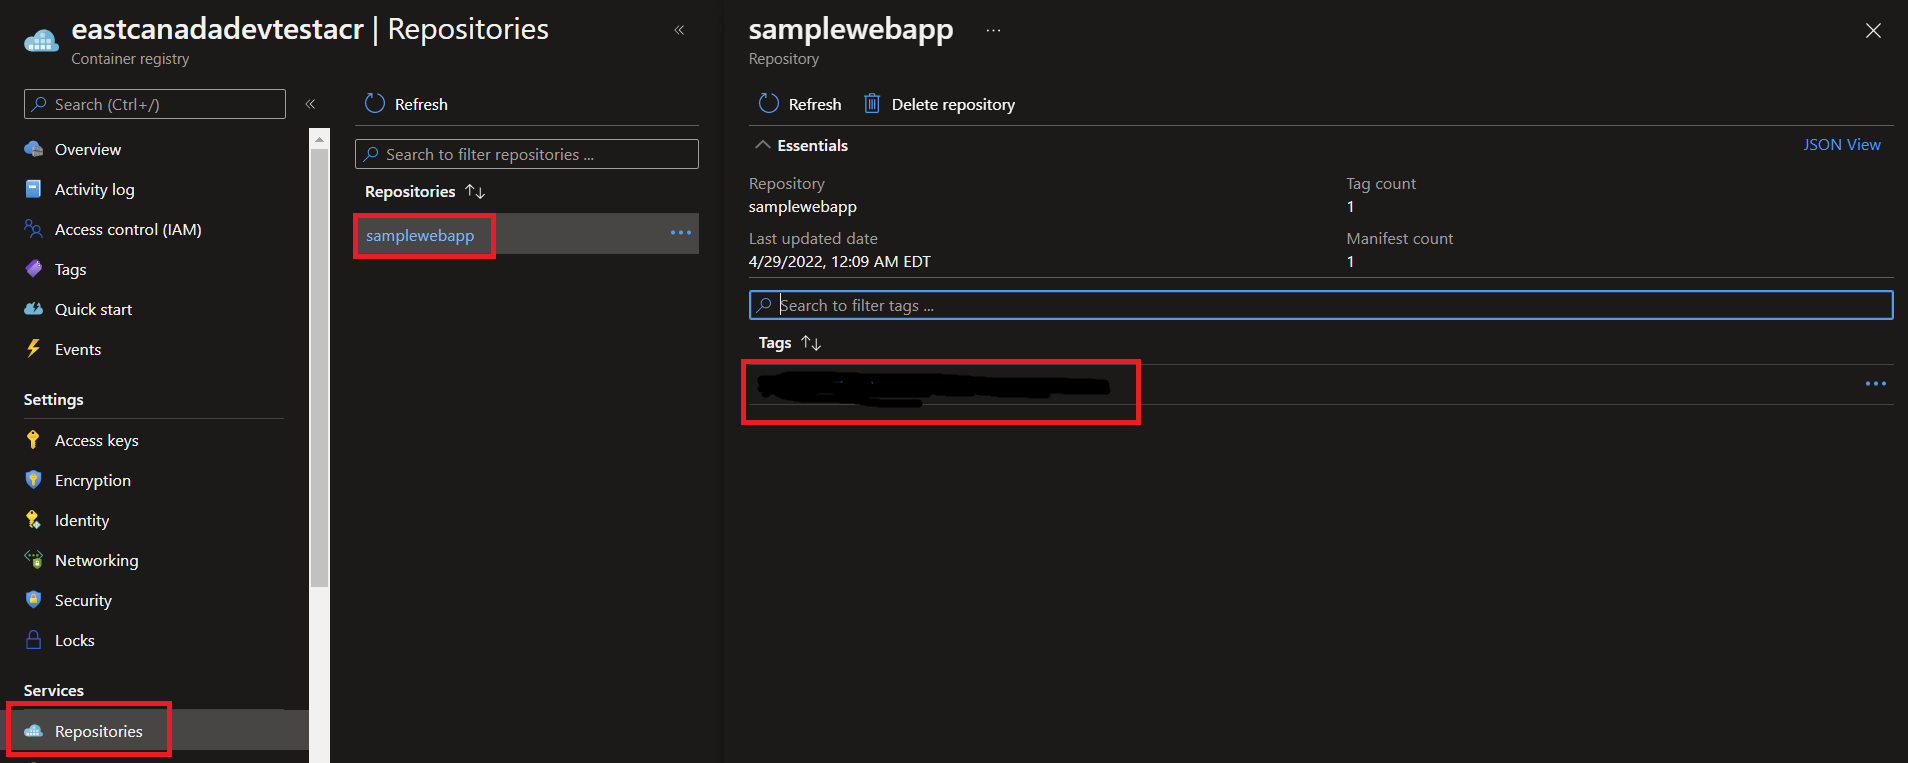
Finally, when the deployment is done, you can go into the ACR to have a look at your newly pushed image:
Congratulations, you have pushed your image to an Azure Container Registry using GitHub Actions Workflow!
Next Steps
Now that we have the image in our ACR, the next steps that we could do would be to pull that image using GitHub Actions Worflows and deploy it to Azure.
I hope this article has been useful to you! Again, and as always, I’d love to hear your feedback and if you have any questions or something you’d like to add based on your experience, please let me know in the comments section below!
If you’d like to see more content like this in the future and keep in touch, feel free to follow me on Twitter and LinkedIn!